Overview
Southern Oregon University uses the Perceptive Content software product to image, organize, and track documents. Perceptive Content is a document imaging, document management, and workflow solution for electronic documents. Workflows route folders of scanned images through institutional processes alleviating the need for physical transfer of paper documents while keeping the documents accessible to appropriate University personnel.
Perceptive Content document imaging consists of the following basic operations:
- Logging in
- Scanning paper documents
- Importing electronic documents
- Importing Electronic Documents using a Perceptive Content Form (Business Services)
- Viewing stored documents
- Relinking a document to a different student
- Moving documents to a different department
Concepts
Bringing a document into Perceptive Content is called "capturing." Documents can be captured in Perceptive Content either singly or in batches, and can be either scanned directly or can be first scanned to file, then the files captured. Scanning directly has fewer steps but requires a special added-cost license which is not needed when loading pre-scanned files. Documents in a batch should share some key values, either student ID or document type, which are assigned at the beginning so they do not have to be individually assigned for each document. When the batch is processed into individual documents, the keys which do not have shared values are individually assigned the other values. When doing just one document, single-loading is more efficient than doing a batch of one because the batch steps are omitted. Otherwise, the proposed keys and final keys steps are the same.
Logging In To Perceptive Content
- Choose the Perceptive Content desktop app from your Windows Start menu or your configured Windows shortcut.
- Log in with your SOU network username and password.
Scanning Paper Documents
Scanning a Paper Document Linked to a Banner Student Record
- Log in to Perceptive Content.
- On the Perceptive Content toolbar click on the drop down arrow next to the Capture button and select the scanning profile.
- A popup window for entry of values called Proposed Keys should appear. The Drawer and Document Type list will vary depending on your Capture profile selected. An example is shown below:
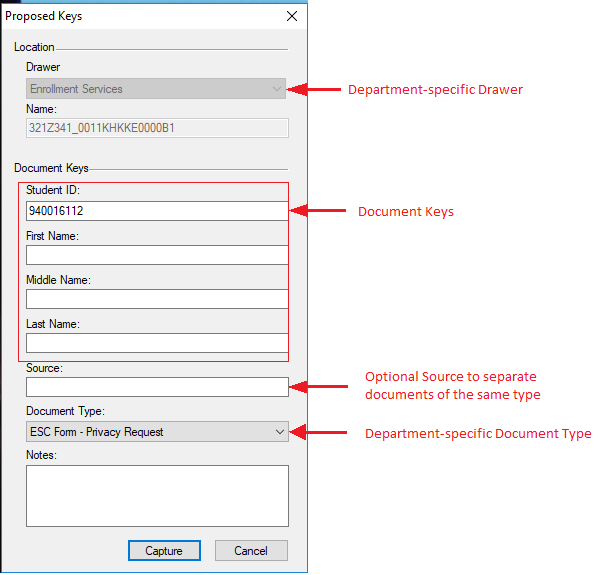
- Enter the ID of the student from Banner.
- Choose the Document Type from the drop-down list.
- If you do not want the document appended to an existing document of the same type, enter any text into the Source field.
- Click the Capture button.
- Wait for the scanner capture to complete, verify the displayed scanned image, and click the Save button to save the document into the Perceptive Content repository.
Scanning a Paper Document and Manually Entering Student Identifying Fields
- Log in to Perceptive Content.
- On the Perceptive Content toolbar click on the drop down arrow next to the Capture button and select the capture profile for scanning.
- A popup window with the proposed keys that Perceptive Content remembered from your last manual entry capture should appear. The Drawer and Document Type list will vary depending on your department. An example is shown below:
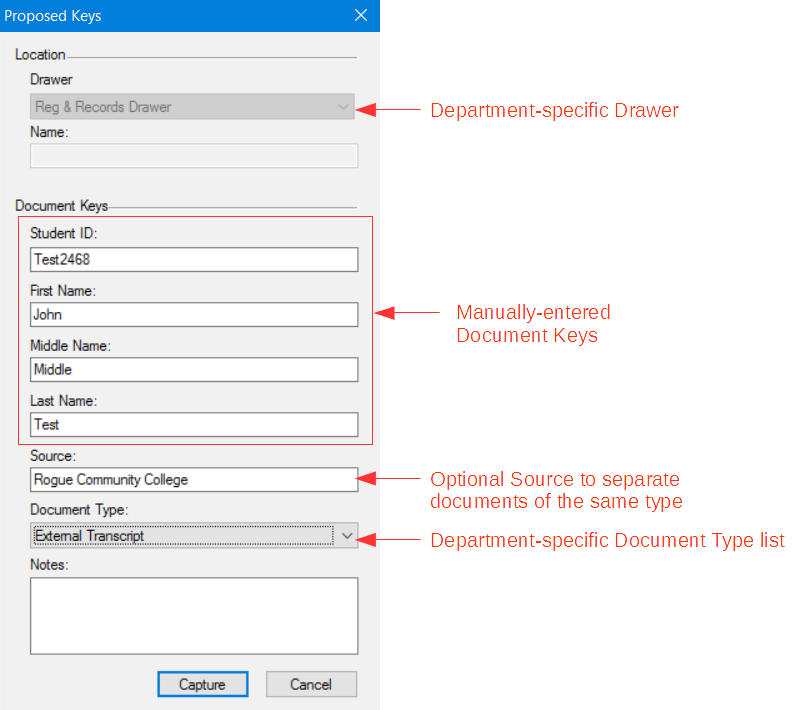
- Enter the student ID and first, middle, and last name values.
- Choose the Document Type from the drop-down list.
- If you do not want the document appended to an existing document of the same type, enter any text into the Source field.
- Click the Capture button.
- Wait for the scanner capture to complete, verify the displayed scanned image, and click the Save button to save the document into the Perceptive Content repository.
Importing Electronic Documents
Importing one Electronic Document Linked to one Banner Student Record
This is for students who are in Banner. You will supply the student ID to the workflow and programs will look up the other student information for you. By importing one document at a time, one student at a time, you avoid the overhead of batch processing. This is more efficient for a very small number of students or documents, or where consecutive documents are dissimilar, neither for the same student nor the same type of document. The scanning profile will be unique for your department and will be single rather than batch.
- Log in to Perceptive Content.
- Capture the file.
- If the file is a JPG or TIFF image, choose a profile which does single import from disk.
- For other file types like PDF, choose a capture profile using Image Now printer to convert it to a type that can be annotated.
- The Proposed Keys window should appear. The Drawer and Document Type list will vary depending on your department. An example is shown below:
- Enter the student's current ID. (Name will be retrieved from the Banner database when you Save in step 9.)
- Choose the Document Type from the drop-down list.
- If you do not want the document appended to an existing document of the same type, enter any text into the Source field.
- Click the Capture button.
- Browse to the document you want to import and click on the Open button.
- Verify the displayed imported document, and click the Save button to save the document into the Perceptive Content repository.
Alternative Drag & Drop Method
- Click the Documents button on the Perceptive Content toolbar to display the Perceptive Content Explorer.
- Open the file manager on your workstation and navigate to the folder containing the document(s) you want to import.
- Resize the file manager and Perceptive Content Explorer windows to facilitate drag & drop.
- Drag a document or image file from your file manager to the Quick Search tab in the Perceptive Content Explorer window and drop it.
- A "New Document" popup window should appear. Choose the application plan for your department from the Select an application plan drop-down list.
- Choose your department's drawer from the Drawer drop down list.
- Enter ID into Properties (name fields will fill from the database based on ID when you click OK in step 11 below).
- Choose the Document Type from the drop-down list, and enter the optional Source field if you want to separate this document from other documents of the same type.
- Click the Send to workflow queue check box.
- Select the starting workflow step for your workflow from the drop-down list.
- Click the OK button to import the document/image into the Perceptive Content repository. A preview of the document you just imported will be displayed.
Importing an Electronic Document and Manually Entering Student Identifying Fields
This is for loading a single document for a single student who is not in Banner. You must enter the ID, last name, first name, and middle name/initial, and any custom data items relevant for the document that you wish to have values for. Single document load works best when doing just one document or when consecutive documents are for different students and are of different types such that batch (common, shared) values must be overwritten for every document. The scanning profile will be unique to your department.
- Log in to Perceptive Content.
- On the Perceptive Content toolbar click on the drop down arrow next to the Applications button and select your department's manual entry option.
- If you are importing a JPG or TIFF image file, on the Perceptive Content toolbar click on the drop down arrow next to the Capture button and select Import from disk - Single Mode. If you are importing any other file type, open the file and print it on the ImageNow Printer.
- A popup window with the proposed keys that Perceptive Content remembered from your last manual entry capture should appear. The Drawer and Document Type list will vary depending on your department. An example is shown below:
- Enter the correct values for the Student ID and First/Middle/Last Name.
- Choose the Document Type from the drop-down list.
- If you do not want the document appended to an existing document of the same type, enter any text into the Source field.
- Click the Capture button.
- Browse to the document you want to import and click on the Open button.
- Verify the displayed imported document, and click the Save button to save the document into the Perceptive Content repository.
Alternative Drag & Drop Method
- Click the Documents button on the Perceptive Content toolbar to display the Perceptive Content Explorer.
- Open the file manager on your workstation and navigate to the folder containing the document(s) you want to import.
- Resize the file manager and Perceptive Content Explorer windows to facilitate drag & drop.
- Drag a document or image file from your file manager to the Quick Search tab in the Perceptive Content Explorer window and drop it.
- A "New Document" popup window should appear. From the Select an application plan drop-down list choose your department's manual entry option.
- Enter the correct values for the Student ID and First/Middle/Last Name.
- Choose the Document Type from the drop-down list, and enter the optional Source field if you want to separate this document from other documents of the same type
- Click the Send to workflow queue check box.
- Select the starting workflow step for your workflow from the drop-down list.
- Click the OK button to import the document/image into the Perceptive Content repository. A preview of the document you just imported will be displayed.
Importing a Batch of Electronic Documents Linked to One or More Banner Student Records
Batch loading of documents is done when there are many documents for one student or when there are documents of the same single type for many students. It trades a little bit of overhead up front setting up the common values for reduced data entry later because the shared values are already assigned. The scanning profile will be unique to your department and will be a "batch" rather than "single" scan.
- Log in to Perceptive Content.
- On the Perceptive Content toolbar click on the drop down arrow next to the Applications button and choose your department's manual entry option.
- On the Perceptive Content toolbar click on the drop down arrow next to the Capture button and select the correct Capture for your department.
- A popup window with the proposed keys should appear. Select Drawer appropriate for your department. Enter appropriate keys: if you are scanning many documents for one person then enter the student's ID, or if you are entering a batch of same documents for many students, enter the document type, but not both.
- If you do not want the documents appended to an existing document of the same type, enter any text into the Source field.
- Click the Capture button.
- Browse to the folder containing the documents/images you want to import.
- Click on the first document in a range.
- Shift-Click on the last document in a range.
- Ctrl-Click on additional documents to add them to the selection.
- When all of the documents you want to import are selected, click the Open button.
- Click the Batches button on the Perceptive Content toolbar.
- Click the Ready for QA link under Batches.
- Double-click on the batch you just imported (click the Refresh toolbar button if you don't see it).
- Click Mark page as OK under Batch Processing in the upper left. Repeat for each page in the batch. Ignore the Document Type for each page for now; you will edit the document types in the Link step below.
- In the Perceptive Content Explorer, click the Ready for Linking link under Batches.
- Double-click on the batch you just QA'd (click the Refresh toolbar button if you don't see it).
- Click Link this page under Batch Processing in the upper left.
- Update the student ID or Document Type depending on which batch process you are doing.
- Edit the Source and Document Type fields appropriately.
- Click Save this page under Batch Processing.
- Repeat the Link through Save steps above for each document.
- After saving the last page, click your department's view under Documents, sort by the Created column, and verify that all documents in the batch were saved correctly.
Importing a Batch of Electronic Documents and Manually Entering Student Identifying Fields
This is like scanning a batch for students in Banner, except it is for students not in Banner so the ID, last name, first name, middle name/initial, and custom fields must all be manually populated. This scanning profile will be unique to your department. It will be "batch" rather than "single" mode. This adds a little overhead up front but saves re-entering much of the data which repeats. There are two kinds of batches, one for many images for a single student, one for a single document type for many students.
- Log in to Perceptive Content.
- On the Perceptive Content toolbar click on the drop down arrow next to the Applications button and select the manual entry option for your department.
- On the Perceptive Content toolbar click on the drop down arrow next to the Capture button and select the batch import for your department.
- A popup window with the proposed keys that Perceptive Content remembered from your last manual entry capture should appear. The Drawer and Document Type list will vary depending on your department. An example is shown below:
- Enter the Student ID and First/Middle/Last Name.
- Choose the Document Type from the drop-down list. If you are importing a batch containing multiple document types, pick any of the document types; you will edit the document type for each page of the batch in the Link step below.
- If you do not want the documents appended to an existing document of the same type, enter any text into the Source field.
- Click the Capture button.
- Browse to the folder containing the documents/images you want to import.
- Click on the first document in a range.
- Shift-Click on the last document in a range.
- Ctrl-Click on additional documents to add them to the selection.
- When all of the documents you want to import are selected, click the Open button.
- Click the Batches button on the Perceptive Content toolbar.
- Click the Ready for QA link under Batches.
- Double-click on the batch you just imported (click the Refresh toolbar button if you don't see it).
- Click Mark page as OK under Batch Processing in the upper left. Repeat for each page in the batch. Ignore the Document Keys for each page for now; you will edit the document keys in the Link step below.
- In the Perceptive Content Explorer, click the Ready for Linking link under Batches.
- Double-click on the batch you just QA'd (click the Refresh toolbar button if you don't see it).
- In the upper right under Properties choose the appropriate manual entry application plan for your department.
- Edit the Student ID, First/Middle/Last Name, Source, and Document Type fields appropriately.
- Click Save this page under Batch Processing.
- Edit the Document Keys and save each additional page.
- After saving the last page, click your department's view under Documents, sort by the Created column, and verify that all documents in the batch were saved correctly.
Importing Electronic Documents using a Perceptive Content Form to Pull Banner Data
The Business Services Service Center is the first group to have their document imaging Workflow use a Perceptive Content Form to pull Banner data correlatng to the document they loaded. By the end of 2018 The other groups will also be pulling Banner data that way since Banner Forms will no longer work.
- Log in to Perceptive Content.
- On the Perceptive Content toolbar click on the drop down arrow next to the Capture button and select the Capture Profile (BS_AP_Batch for Service Center).
- If your Capture Profile allows multiple document types, you will get a pop-up box allowing the document type to be selected. The Service Center defaults as an Invoice, but that will adjust once the Document Number is entered. The Service Center does not see this step.
- A popup box will then allow you to browse to the folder containing the documents you want to import.
- Click on the first document in a range.
- Shift-Click on the last document in a range.
- Ctrl-Click on additional documents to add them to the selection.
- When all of the documents you want to import are selected, click the Open button. This will pull them into Perceptive Content.
- Click the Batches button on the Perceptive Content toolbar. This will open up the Perceptive Content Explorer.
- Double-click on the batch you just imported (click the Refresh toolbar button if you don't see it). This will open up the Perceptive Content Viewer.
- For each document shown, verify that it looks legible then click Link this page under Batch Processing in the upper left side.
- After linking all of the documents, on the Perceptive Content toolbar, click on the drop down arrow next to the Workflow button and select the first step of your department's workflow. For Service Center, select 1. Assign Document Number
- The Perceptive Content Explorer will open up listing the documents waiting in the first step of the workflow. Double click on the first one
- The document will open up in the workflow with the form available for you to enter the document ID. Under the View menu, make sure Forms and Properties are checked.
- Enter the Key field for the form. For the Service Center that is Document Number. Tab to the next field. At the time you leave the key field Banner will be queried to fill in the rest of the form.
- If for some reason the wrong document number was put in, change it and tab off the field again. The corresponding data will be updated.
- Once the form has been filled, you can link the data to the document by routing forward. This can be done under the Workflow menu or clicking the Route Forward button at the bottom. This will bring in the next document to be updated.
- Once you have routed the document to the next step, the Document Keys and the Custom Properties will be updated with the data from the form.
Viewing Stored Documents
- Log in to Perceptive Content.
- Click the down arrow next to the Documents button on the Perceptive Content toolbar, and choose the documents list you want to view.
- Enter the ID for the student whose documents you want to view in the Quick Search tab, or choose another key field and match condition from the drop-down lists.
- Click the Go button or press ENTER to show the matching documents.
- Double-click any document in the list to view it.
NOTE: The "Name" field in the the search fields drop-down list is the unique internal ID that Perceptive Content assigns to every document. This is the same Name field that appears in the Properties pane of the Content Viewer when you open a stored document. Unfortunately this field cannot be removed from the search fields drop-down list.
Advanced Search
- Click the Documents button on the Perceptive Content toolbar.
- In the Perceptive Content Explorer, expand Documents and choose the Department or another view to search.
- Click the Search tab at the top of the document list.
- Click the green + sign.
- Choose the Field you want to search, and the Operator and Value to search the field by.
- Click OK.
- Click the green + sign and add additional search conditions as appropriate.
- When you have added all the search conditions click the Go button on the right side of the window to view matching documents.
- To export the matching list to CSV (Excel), right-click on one of the displayed records and choose Export Grid.
- To save this search for future use, click the Save Private Filter button on the toolbar.
Relinking a Document to a Different Student
If you discover that a document is linked to an incorrect student, follow the steps below for your department to relink the document to the correct student.
Raider Student Services
- In the Pereceptive Content Explorer, open the document from the Raider Student Services - All Documents view and verify that it is linked to the wrong student. If the Student ID needs to be changed in the Key Fields change it before Adding it to the workflow.
- Back in the Perceptive Content Viewer, choose Workflow > Add to Workflow > Relink Document and click the Add button.
- Still in the Perceptive Content Viewer, choose Workflow > Open in Workflow.
- If you don't see the Properties pane on the right side of the screen choose View > Properties or press F7.
- At the top of the Properties pane choose the ESC Application Plan if it's not already selected.
- You can change the Source and/or Document Type if needed. You may also want to add Notes about why you relinked the document.
- Click the Save button.
- Choose Workflow > Route Anywhere > Raider Student Services Capture and click Route to capture the new student's custom properties.
- The document should now appear in the Raider Student Services Documents view under the correct Student ID.
Relinking a Document to a Different Document Number
If you discover that a document is linked to an incorrect document number (invoice, purchase order or journal voucher), follow the steps below to relink the document to the correct document number.
Service Center
- In the Pereceptive Content Explorer, open the document from one of the Business Services Accounts Payable views and verify that it is linked to the wrong document number.
- Under the Pereceptive Content Explorer, right click on the document that needs to be updated and select Add to Workflow....
- From the Perceptive Content Toolbar, select the worklow.
- This will bring up teh Perceptive Content Explorer. Double click on the document to open it up in the workflow.
- Update the Document number and tab off the field. The rest of the form will update.
- Routing the workflow forward will update the Document Key and Custom Properties.
- Route forward in the Workflow to the File Cabenet. This will archive the document and take it out of the workflow.
- The document should now appear in the Business Services Application of Payments view under the correct Document Number.
Moving Documents to a Different Department
The All Documents view in the Perceptive Content Explorer allows you to search/view all documents in all departments that you have access to. However, if needed and you have the appropriate user permissions, you can move documents to a different department's drawer/view.
Moving a Single Document
- Open the document you want to move in the Perceptive Content Explorer.
- If you don't see the Properties pane in the upper right choose View > Properties or press F7.
- In the Properties pane choose the department drawer you want to move the document to from the drop-down list.
- Click the Save button to complete the move.
Moving Multiple Documents
- Select the documents you want to move in Preceptive Content Explorer (use SHIFT+Click to select a range, CTL+Click to select additional individual documents).
- Right-click on the selection and choose Move...
- Choose the department you want to move the documents to from the Filter By drop-down list. If you don't see the department you need, contact your supervisor or the IT Help Desk to have your permissions expanded.
- Type the same department name into the Container Name field exactly as it is spelled in the Filter By field.
- Click Search. The department name should appear under Path.
- Click OK to move the documents.
- Click the Refresh button (F5) and the selected documents should disappear.
- Click the target department's Documents view and ensure that the documents were successfully moved.
Defining Capture Profiles
- Choose the Perceptive Content desktop app from your Windows Start menu or your configured Windows shortcut.
- Log in with your SOU network username and password.
- Under the Capture drop-down, choose Manage Capture Profiles ...
- Continue with the steps below for your department
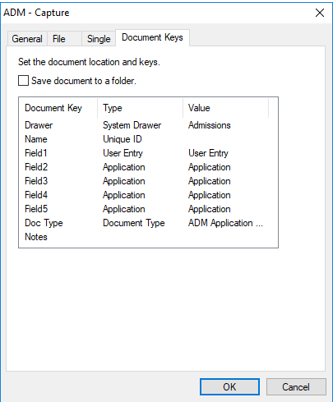
For Admissions
- Click Create
- In the General tab
- Name: enter ADM - Capture
- Description: optional
- Source – choose File
- Mode – choose Single
- Send To - choose (prompt User)
- In the File tab
- Accept defaults
- In the Single tab
- From Application Plan drop-down, choose Admissions - Manual Application Plan
- In the Document Keys tab – set up like this (ADM Application Undergraduate for the default document type):
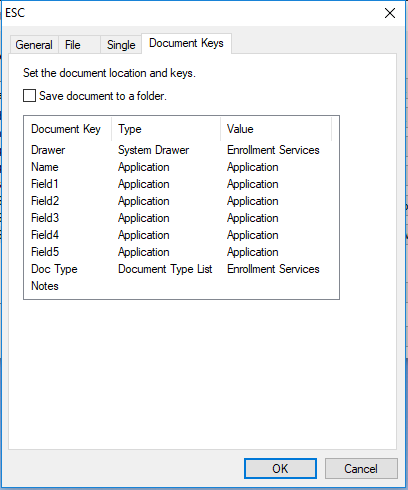
For Raider Student Services
- Single document
- Click Create
- In the General tab
- Name: enter ESC Single
- Description: optional
- Source – choose File
- Mode – choose Single
- Send To - choose Raider Student Services Capture
- In the File tab
- Accept defaults
- In the Single tab
- From Application Plan drop-down, choose ESC Manual Entry
- In the Document Keys tab – set up like this:
 :
: - Click Ok
- Batch by student
- Click Create
- In the General tab
- Name: enter ESC Batch by student
- Description: optional
- Source: choose File
- Mode: choose Batch
- Send to: choose Raider Student Services Capture
- In the File tab
- Accept defaults
- In the Batch tab
- Check the Bypass QA Processing Step box
- In the Document Keys tab - set up like this:
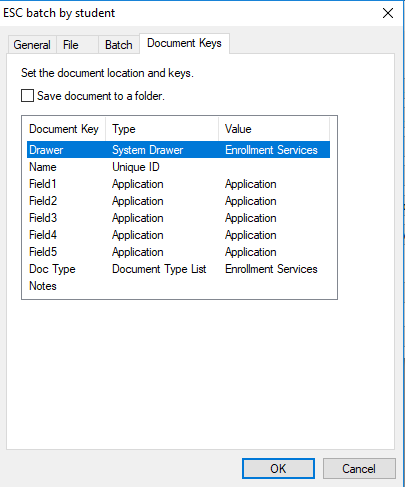
- Click OK
- Batch by document type
- Click Create
- In the General tab
- Name: enter ESC Batch by document type
- Description: optional
- Source: choose File
- Mode: choose Batch
- Send to: choose Raider Student Services Capture
- In the File tab
- Accept defaults
- In the Batch tab
- Check the Bypass QA Processing Step box
- In the Document Keys tab - set up like this:

- Click OK
Connection Profiles
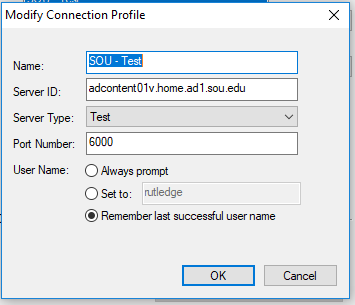
SOU has two Perceptive Content systems, one for production, one for non-production. The production system always references the Banner production database. The non-production system will point to one of the non-production databases. It is often refered to as the "test system" though it may be pointing at the PPRD or DEVL database, not necessarily TEST.
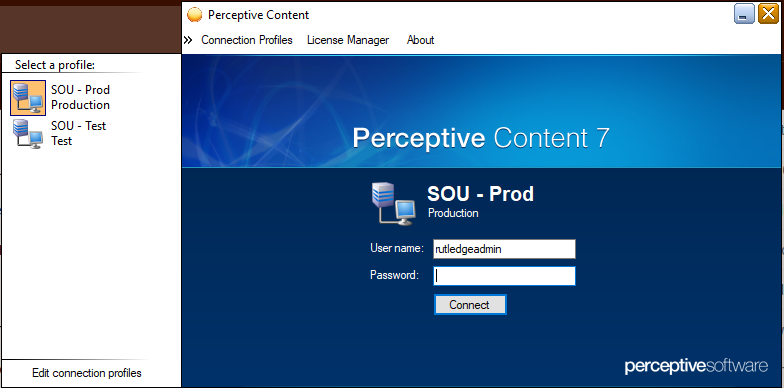
Select a connection profile
To change systems from production to non-production or non-production to production,
- Choose the Perceptive Content desktop app from your Windows Start menu or your configured Windows shortcut.
- Do not log in.
- Click the Connection Profiles item in the upper left section of the login screen
- Select the Profile you wish to connect to
Create a connection profile
- Choose the Perceptive Content desktop app from your Windows Start menu or your configured Windows shortcut.
- Do not log in.
- Click the Connection Profiles item in the upper left section of the login screen
- Click Edit connection profiles near the bottom of the window
- Click Create
- Fill out the New Connection Profile with the values from the Modify Connection Profiles dialogs below
Production Non-Production 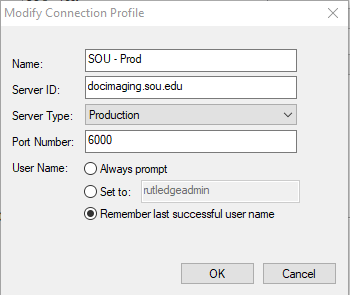
Additional Tips
- By default, Perceptive Content remembers the last entry you chose from the Applications, Documents, and Capture drop-down lists on the Perceptive Content toolbar. When you click one of those buttons it launches the last entry you chose. You can see the entry it will launch by hovering over the button. You can change this default behavior from Settings > Options > Toolbar on the Perceptive Content toolbar.
- By default, Perceptive Content remembers the last values you chose for Source and Document Type during scanning/importing of a document. If you do not want these remembered from the previous capture, choose Settings > Options > Batches from the Perceptive Content toolbar and uncheck "Remember document key values between links".
- See the official Perceptive Content User Guide for additional guidance.


