Overview
The Office of Admissions tracks documents using the Perceptive Content document imaging system. The admission process for document imaging consists of three parts: scanning or importing documents, routing documents via a workflow, and reviewing documents.
Scanning in a Document
- Open up Banner and go to the Quick Application form (QUICKAPP). The scanning of a document is tied to the form. In Banner browse to the person you will scanning the document for and bring up the student's information.
- On the Perceptive Content toolbar click on the drop down arrow next to the Capture button and select the scanner profile that has been set up for you.
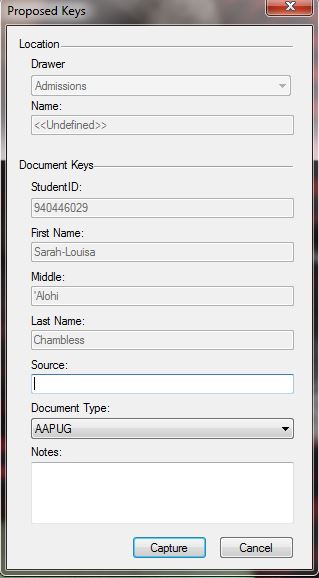
- A popup with the proposed keys that Perceptive Content retrieved from the Quick Application form (QUICKAPP) should appear. You can select the Document Type from a drop down box and also enter in a source. The optional source area is used to distinguish between documents that have the same document type for a student but should be treated as different documents. Once filled out click the capture button.
Note: If you do not want the the source and document type to be remembered from previous run you can turn this off by going to settings -> options and then click on batches an uncheck the "Remember document key values between links".
- A preview of the image will be displayed. Click save to save the document into the Perceptive Content system.
Importing a Document
- Open up Banner and go to the Quick Application form (QUICKAPP). The importing of a document is tied to the form. In Banner browse to the person you will scanning the document for and bring up the students information.
- On the Perceptive Content toolbar click on the drop down arrow next to the Capture button and select "Import from disk - Single Mode"
- A popup with the proposed keys that Perceptive Content retrieved from the Quick Application form (QUICKAPP) should appear. You can select the Document Type from a drop down box and also enter in a source. The optional source area is used to distinguish between documents that have the same document type for a student but should be treated as different documents. Once filled out click the capture button.
Note: If you do not want the the source and document type to be remembered from previous run you can turn this off by going to settings -> options and then click on batches an uncheck the "Remember document key values between links".
- Browse to the document you would like to import and click on the open button.
- A preview window of the document will appear. Click on the save button.
- You can also drag and drop a document into the Perceptive Content Explorer.
- Make sure you have Banner and the Quick Application form (QUICKAPP) open and drag a document from your desktop computer into the All Admissions Documents - Quick Search area. A New document pop up will appear. Under Application Plan select QuickApp Form. Below the drop down check "Use as default application plan" so that all previous runs will automatically default to "QuickApp Form". After setting the type and optional Source click the ok button. A preview of the image will be displayed, note the image was saved into the system when you clicked OK. If you close the preview window the document will still be saved in the system.
Viewing and Searching for Documents
- From the Perceptive Content tool bar click on Documents.
- This should take you to the "All Admission Documents" area in the Perceptive Content Explorer. If not, expand documents and click on "All Admission Documents".
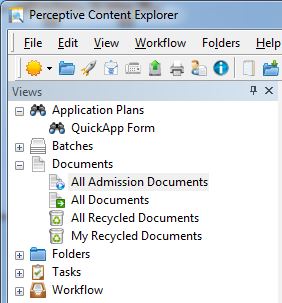
- This view will display all the admission documents that are in the system. If you would like to search for an individual student you can enter in their SOU ID in the quick search area and click go. You can also channe your search criteria by clicking on either one of the drop down arrows and selecting the apprioriate option for you.

- To view documents that are associated with the student you currently have on the Quick Application Form (QUICKAPP) you can click on the plus sign next to Applications Plans and click on QuickApp Form.
Sending/Moving Files in a Workflow
- To add a document to a workflow right click on the document and select "Add to Workflow". You will then be able to move the document to any of the 7 workflow areas.
- Once an item has been added to a workflow you can browse to the workflow by either clicking on the workflow drop down on the Perceptive Content tool bar or by clicing on the plus sign to the left of Workflow in the Perceptive Content Explorer.
- Once you have opened a workflow you can double click on the image to open in the Perceptive Content Viewer. You can make changes to the document along with routing it to another workflow. If you do not need to view the document you can also right click on it and click on workflow -> route anywhere. This will allow you to select the next workflow area the document should be routed to.


