Overview
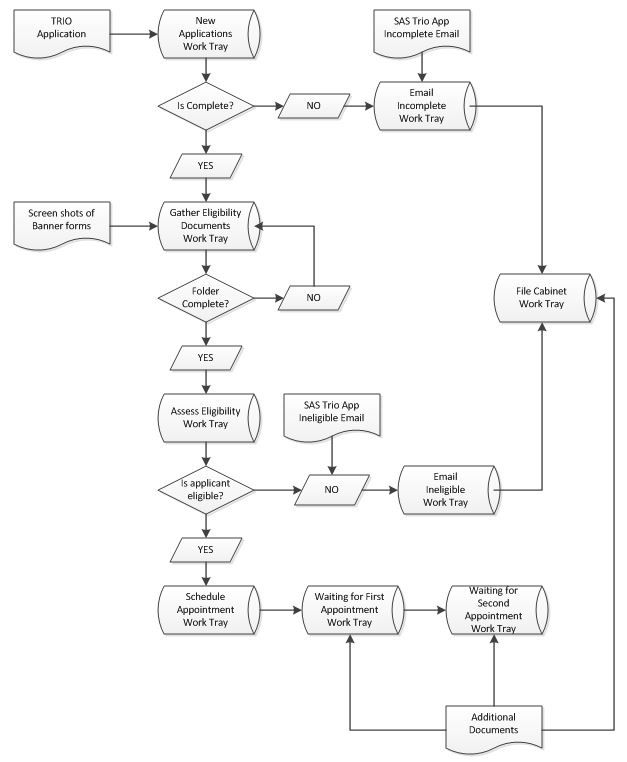
Success at Southern tracks documents for the federal TRIO program using Perceptive Content Document Imaging. Perceptive Content uses Workflows to organize and process documents.The SAS TRIO Person workflow tracks students applying to the Success at Southern's federal TRIO program from receipt of application to "being served." Each applicant has a folder which includes both scanned images of paper documents and screen shots from those generated electronically. Individual areas within the workflow represent a specific type of work to be done. As that work is completed the folder moves to the next area for the next unit of work.
Accessing the SAS TRIO Person Workflow
- Log in to Perceptive Content.
- Click on the Workflow button from the Perceptive Content toolbar.
- In the Perceptive Content Explore expand the SAS TRIO Person Workflow. By clicking on any of the workflow areas you can see what folders have been assigned to this area.
Setting up a new Capture Profile
A capture profile needs to be setup before you can load any documents into Perceptive Content.
- Log into Perceptive Content.
- Click the drop down arrow next to Capture from the toolbar and select Manage Capture Profiles.
- Either select a capture profile you want to update and select Modify or select Create to make a new one.
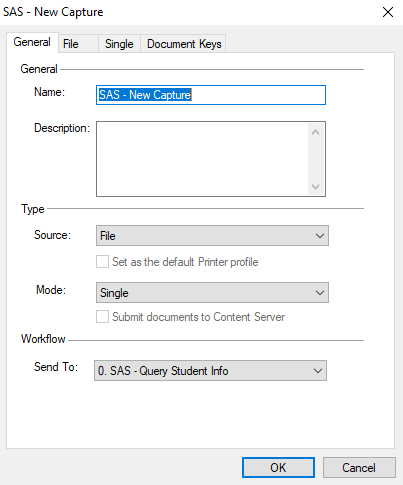
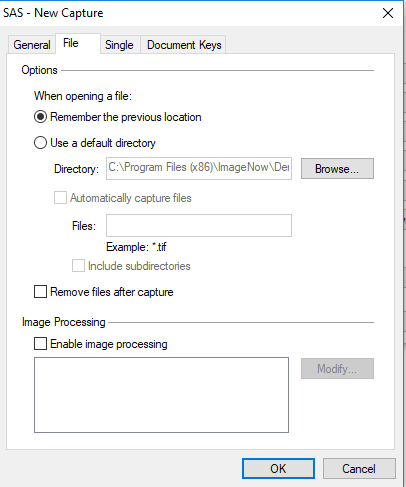
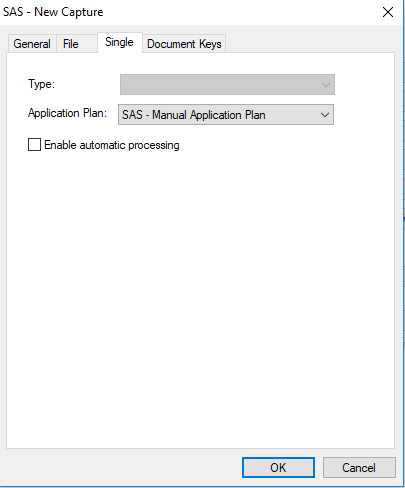
- Set the capture up to match the following:

Adding a New Application
- Log into Perceptive Content.
- Click the drop down arrow next to Capture from the toolbar and select your capture profile.
- Two popup windows will appear. The First one is for the folder. Enter the Student ID into the Folder Name field. Once you move off of the field (ie. tab), click OK.

- The next box is for the document. Enter the Student ID then choose the Document Type from the drop-down list. Update the Source if needed.
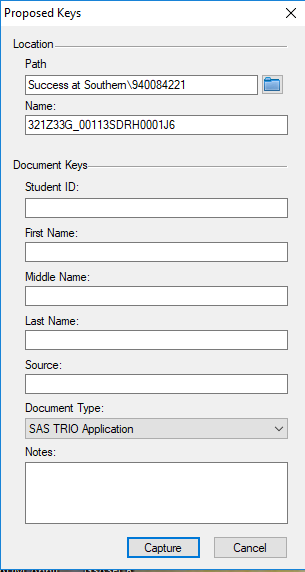
- Click the Capture button.
- Browse to the document you want to import and click on the Open button.
- Verify the displayed imported document, and click the Save button to save the document into the Perceptive Content repository. The Student's name will be pulled in during a step after you save.
- Documents will be placed in a folder with a folder name associated to the students 940 number. The Student's name and othe details are pulled from Banner at this step.
Alternate Way Drag and Drop (folder for ID doesn't exist yet)
- Click the down arrow next to the Folders button on the Perceptive Content toolbar, and choose the documents list you want to view (SAS Folders).
- Find your document and drag it into the white folder area or onto "SAS Folders".
- If this is the first time using drag and drop select SAS - Manual Application Plan under application plan, Success at Southern under Drawer and click the link or key to the right of the plan.
- The Create Location box will open up. Put the Student ID in for the Folder Name and click OK.
- Put the Student ID in under Properties and Click OK.
- The document will come up. Save. The student's name will get pulled in during the next step in the workflow.
- Close the document.
Alternate Drag and Drop into folder
- Click the down arrow next to the Folders button on the Perceptive Content toolbar, and choose the documents list you want to view (SAS Folders).
- Double click on the folder you would like to add documents to.
- Drag your document into the open folder.
- Make sure the application plan is SAS-Manual Applicaation Plan and the Drawer is Success at Southern. Update the Type to the appropriate one.
- Enter the Student ID in field1 and Click OK.
- The document will come up. Save. The student's name will get pulled in during the next step in the workflow.
- Close the document.
Viewing Stored Documents
- Log in to Perceptive Content.
- Click the down arrow next to the Folders button on the Perceptive Content toolbar, and choose the documents list you want to view (SAS Folders).
- Enter the ID for the student whose documents you want to view in the Quick Search tab, or choose another key field and match condition from the drop-down lists. Should be noted that the folder name maps to the students 940 number.
- Click the Go button or press ENTER to show the matching folders.
- Double click the folder to view its content.
- Double-click any document in the list to view it.
Advanced Search
- Click the Documents button on the Perceptive Content toolbar.
- In the Perceptive Content Explorer, expand Documents and choose the Department or another view to search.
- Click the Search tab at the top of the document list.
- Click the green + sign.
- Choose the Field you want to search, and the Operator and Value to search the field by.
- Click OK.
- Click the green + sign and add additional search conditions as appropriate.
- When you have added all the search conditions click the Go button on the right side of the window to view matching documents.
- To export the matching list to CSV (Excel), right-click on one of the displayed records and choose Export Grid.
- To save this search for future use, click the Save Private Filter button on the toolbar.
Adding To Workflow
- Log in to Perceptive Content.
- Click the down arrow next to the Folders button on the Perceptive Content toolbar, and choose the documents list you want to view (SAS Folders).
- Enter the ID for the student whose documents you want to view in the Quick Search tab, or choose another key field and match condition from the drop-down lists.
- Click the Go button or press ENTER to show the matching folders.
- Right click on the folder and select add to workflow.
- Select the workflow step you would like to send the folder to and click add.
- To move a folder from one step to the next you can right click on the folder select workflow and then route anywhere. You can then select the next location for the folder to go to. If all work on the folder has been completed you can select "File Cabinet" and the folder will be removed from the workflow.
Incomplete Applications
If an application is incomplete, the folder is moved to the Email Incomplete queue, an email is sent indicating the application was incomplete, and the folder is moved to the File Cabinet tray.
- Move the folder to the Email Incomplete work queue.
- Locate the applicants folder in the New Application workflow queue.
- Right-click the applicant's folder.
- Choose Workflow.
- Choose Route Anywhere.
- Choose Email Incomplete.
- Send the email.
- Print the email as a .pdf.
- Drag the .pdf into the applicant's folder and drop it.
- Select the document type as SAS TRIO Email Incomplete.
Complete Applications
If the application is complete, gather documents in the form of Banner screen shots needed to assess the applicant's eligibility to participate in the TRIO program.
- Move the folder to the Gather Eligibility Documentation work queue.
- Gather the required documents.
- From Banner, print each required Banner screen as a .pdf file.
- Drag each pdf document into the applicant's folder asigning the correct document types.
- After all needed documents have been added to the folder, move the folder to the Assess Eligibility work queue.
Assess Eligibility
- Evaluate the TRIO application and supporting documents and use them to fill out the Eligibility Form.
- Scan the Eligibility Form.
- Drop it in the applicant's folder.
- Assign document type as SAS TRIO Eligibility Verification Worksheet.
- Move the folder to the Email Ineligible work queue or the Schedule Appointment work queue depending on your assessment of their eligibility for the TRIO program.
Email Ineligible Applicants
TRIO applicants deemed ineligible will be informed by email.
- Send the email notification to the applicant.
- Print a copy to .pdf.
- Drag the .pdf into the applicant's folder.
- Assign the document type as SAS TRIO Applicant Ineligible.
- Move the folder to the File Cabinet queue.
Processing Eligible Applicants
- After an applicant is determined to be eligible for the TRIO program, their folder will go into the Schedule Appointment work queue until the appointment is scheduled.
- After the appointment is scheduled, the folder will go into the Waiting for First Appointment work queue until that appointment is complete.
- After the first appointment is done, the folder goes into the Waiting for Second Appointment work queue.
- Additional documents may be scanned and added to the folder at any time.
- After the second appointment, the applicant is deemed "served" and their folder is moved to the File Cabinet queue.
Special Documents
If the document type with “-“ you are expected to add additional Custom Properties vi Document Detail
| Document Type | Suggested Document Detail Value |
|---|---|
| SAS Registration | Term + date in YYYY-MM-DD format |
| SAS TRIO Contact Sheet | Date in YYYY-MM-DD format |
| SAS TRIO Correspondence | Something short identifying the subject of correspondence |
| SAS TRIO Miscellaneous | Something short identifying the type of misc document |
| SAS TRIO Tutoring | Date in YYYY-MM-DD format |
| SAS Transcript | Date in YYYY-MM-DD format |
SAS TRIO Historical Files
Folders for TRIO applicants which have already been served do not have to go through all of the steps of the workflow. Instead, the documents are scanned and loaded to the folder.
- Open the applicant's folder.
- Scan all of the documents and put them in the applicant's folder.


